Creating a work of art that can amuse ourselves and others is certainly a pride for us, especially we can share knowledge with others. That's what I try to make Adobe Photoshop tutorial about how to combine several images that will produce a work of art.
Tutorial Adobe Photoshop this time, explaining step by step how to combine several photos that will produce a work which I titled "Achieving the end point" to the category of "design", "manipulation" and "humor". Below is the end result of my tutorial that will deliver in Adobe Photoshop tutorials this time.
Step -1. Before creating a new file, you should prepare photos you see in the picture below. To download a photo, you can download it at the URLs that I have prepared.
Url of the first photo = http://www.morguefile.com/archive/display/76606
Url of the second photo= http://www.morguefile.com/archive/display/118865
Url of the third photo = http://www.morguefile.com/archive/display/52203
Url of the fourth photo = http://www.stockvault.net/Sea_water_g13-Blue_water_p3055.html
Step -2. Open the first photo files that will serve as a background. To change the size of the photo, go to Image> Image size. To Width = 500 px, while for Height = 375 px. For Resolution = 300 px / inch.
Step -3. Open the second photo, change image size to Width = 300 px, while for the Height will adjust by itself. From the two windows that have Adobe photoshop, please press the T-mouse and hold on a second photo and then drag the Adobe Photoshop window that contains the first photo.
Step -4. Use the "Lasso Tool" to select part of the photo is required. Then press Ctrl-X and Ctrl-V, it will appear LAYER 2. Delete Layer 1.
Step -5. Give name Layer2 with Baby, then Ctrl-T adjust the image position with the space we want. Use the Eraser Tool (E)> Opacity = 53%> Hardness = 0%, remove the outer edge of the image is not needed.
Step -6. Open the third photo, use the "Clone Stamp Tool (S)" to cover areas that are not needed with the copied area. Then click the Restore Down in the upper right corner and then drag the photo-3 into the work area so that they appear a new layer, rename layer with "WATER" and then drag it to the bottom Layer "Baby".
Step -7. In Layer "Water", go to Image> Adjustments> Desature. Change the Blend Mode to Overlay. Use the Eraser Tool> Brush> Opacity = 53%> Flow = 59% to remove unnecessary areas.
Step -8. Click Layer Baby, then go to Image> Adjustments> Hue / Saturation. For Saturation = -40.
Step -9. Create a new layer, go to "Gradient Tool (G)". In the Gradient Editor> Gradient Type = Noise> Roughness = 100%. In Option please check the "Restrict Colors" and "Add Transparency". Select "Anggle Gradient", put the mouse pointer around the corner, press and hold down the mouse and drag downward. See image below.
Step - 10. Still in the Layer 1, go to Image> Adjustmenst> Desaturate. Then go to Filter> Blur> Gaussian Blur. Use 4px for Radius. Change the Blend Mode to Color Dodge. Go to Image> Adjustments> Level. Set the appropriate image below.
Step -11. We will add the word "FINISH". Select the Background layer, go "Horizontal Type Mask Tool" and then type FINISH. By pressing and holding Ctrl on your keyboard, please adjust the length, width and curvature of the word FINISH.
Step -12. Click the icon "Create Warped Text", change the Style = Arc Upper> check Horizontal> Bend = -23%> Horizontal Distortion = 0%> Vertical Distortion = +58%> OK.
Step -13. Click the "Move Tool (V)", press Ctrl-T and then press Ctrl - V. Go to Layer> Layer Style> Bevel and Emboss. Style = Inner Bevel> Technique = Smoth> Depth = 1000%> Direction = Up> Size = 0 px> Soften = 0pt. In Shading> Angle = 120 o> Use Global Light check> Altitude = 30o. The next step is to check the Drop Shadow. Structure = Overlay> Opacity = 100%> Angle = 120o> Check the Use Global Light> Distance = 0 px> Spread = 0%> size = 7 px. See image below.
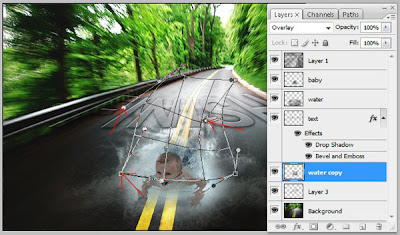
Step - 14. Click the layer Water> Ctrl-T> right click mouse> Wrap. Please adjust the picture "Water" with a picture of "Baby".
Step - 15. Open the fourth photo, click the Restore Down in the upper right corner and then drag the photo-4 to the work area so that they appear Layer 3, set on the Background layer. Press Ctrl - T> slide the mouse pointer into the selected area and then right click and choose Distort. Adjust the position of the curvature of the image with background image. When considered in compliance, then press Enter. Press Ctrl - T select Wrap to adjust the curvature of the image.
Step -16. Still in the Layer 3, change the Blend Mode to Overlay. Go to Image> Adjusments> Desaturate. For smoothing the edges, please use the Eraser Tool with a composition as in the picture below.
Step - 17. Duplicate layer Water, then put above the layer Text. With Ctrl-T> Wrap, set the appropriate position of the curvature of the image background.
Image below is the final result of the step by step has been done. May be useful for the readers.
Subscribe to:
Post Comments (Atom)


0 Comments:
Post a Comment